

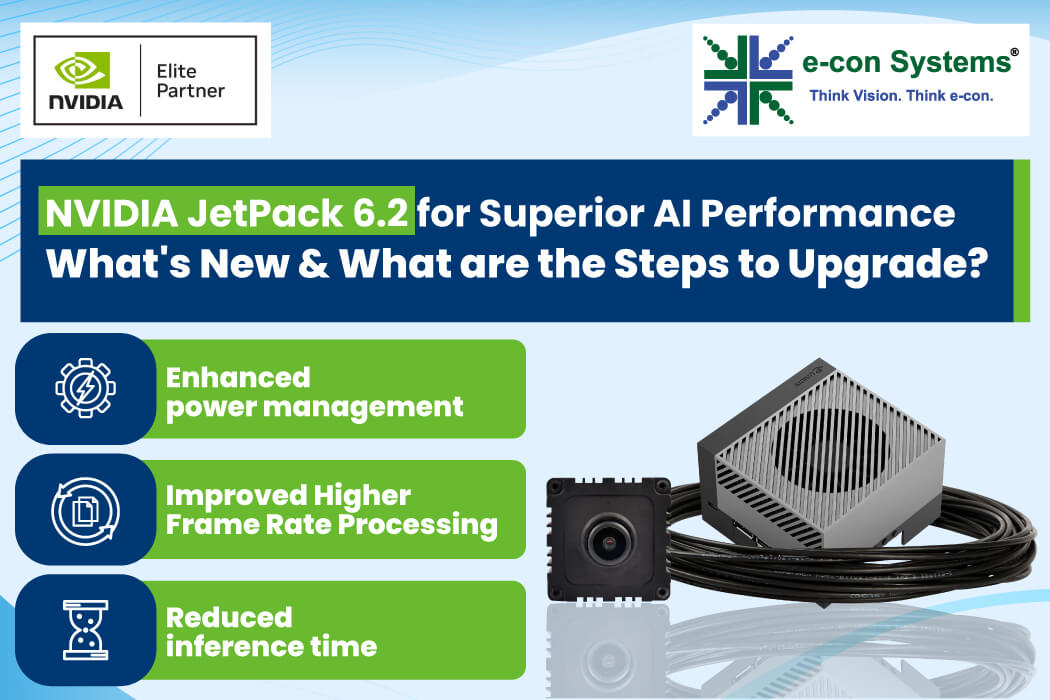
AI-embedded applications require power-efficient, high-resolution cameras capable of real-time responsiveness. Upgrading your existing e-con camera with NVIDIA JetPack™ 6.2 offers a powerful solution, unlocking its full potential and significantly enhancing performance. This article simplifies the upgrade process—even for users with limited experience.
Powerful AI-embedded applications, with their multitasking capabilities and sophisticated software, often strain camera systems, leading to power management challenges and reduced responsiveness. NVIDIA’s Jetpack 6.2’s new feature on the NVIDIA Jetson Orin Nano™ and NVIDIA Jetson Orin™ NX SoM addresses these challenges, optimizing the power supply and enabling your camera to run significantly longer.
This article explores NVIDIA JetPack 6.2, highlighting the key advantages of upgrading for improved power management and efficient AI task execution.
What’s New in NVIDIA JetPack 6.2?
NVIDIA JetPack 6.2 introduced Super Mode, a transformative feature for the Jetson Orin Nano and Jetson Orin NX SoM. This update unlocks enhanced power modes: a 25W mode and uncapped MAXN SUPER mode for the Jetson Orin Nano™ SoM and NX SoM.
Key Benefits of JetPack 6.2
Let’s see the benefits of using new power modes with NVIDIA JetPack 6.2 on the Jetson Orin Nano and Jetson Orin NX SoM.
- Enhanced power management: Expanded power modes allow the camera to adjust power consumption as needed, dynamically benefiting multitasking AI-embedded applications by reducing the power requirement.
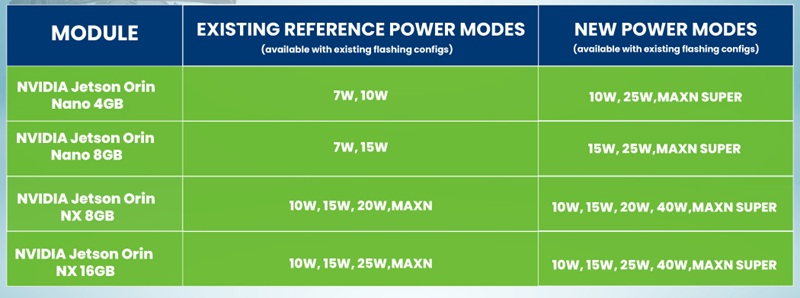
Figure 1: New reference power modes on Jetson Orin Nano and Jetson Orin NX SoM (Source – NVIDIA)
- Improved Higher Frame Rate Processing: The increased bandwidth and AI computing of existing SoM enables the camera to process more frames per second, crucial for high-speed AI applications.
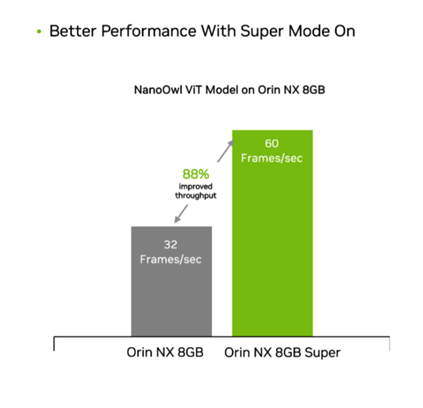
Figure 2: Increased Frame rate on Orin NX 8GB with Super Mode (Source – NVIDIA)
- Reduced inference time: The super mode facilitates faster processing of complex scene data, thereby reducing inference latency and enhancing real-time AI performance.
The image shown below displays the output screen, which shows real-time object detection using our See3CAM_CU81 camera with the NVIDIA Orin™ Nano module in Super Mode, running the YOLOv8 model in a more complex scene.
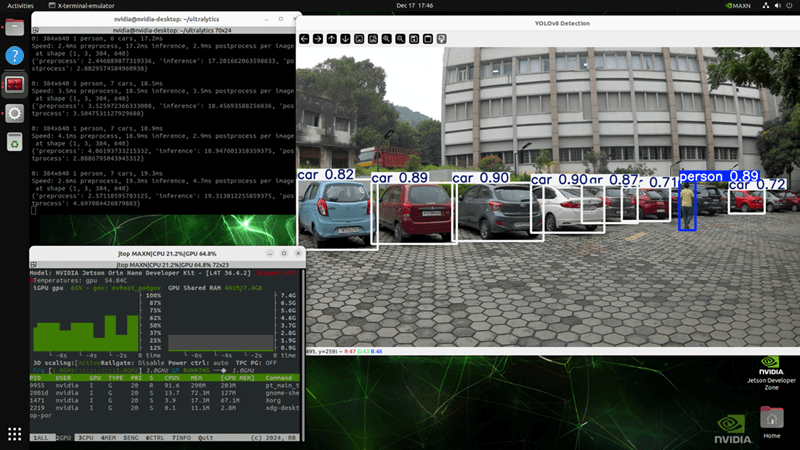 Figure 3: Test image showing real-time object detection
To see the demonstration of the e-con camera with the Super Mode with NVIDIA JetPack 6.2, check out our blog Make your existing NVIDIA® Jetson Orin™ devices faster with Super Mode – e-con Systems.
Now that you know the key features of NVIDIA JetPack 6.2, let’s look at the procedure for upgrading your existing camera to JetPack 6.2.
What Are the Steps to Upgrade Your Camera System?
You can easily upgrade to NVIDIA JetPack 6.2 with your existing camera setup. In this article, you’ll see two upgrade scenarios:
-
Upgrading from Jetpack 6.0 to Jetpack 6.2
If you are upgrading from JetPack 6.0 or if you have upgraded the econ’s camera from NVIDIA Jetpack 6.0 to NVIDIA Jetpack 6.1 using our blog How to Upgrade Your Camera to NVIDIA® JetPack 6.1 and Why it matters?, you’ll need to follow the Upgrading From Jetpack 6.0 to Jetpack 6.2 section.
-
Upgrading from Jetpack 6.1 to Jetpack 6.2
If you are upgrading Jetpack for the below-listed products, follow the Upgrading from Jetpack 6.1 to Jetpack 6.2 section.
Upgrading From Jetpack 6.0 to Jetpack 6.2
Step 1. Setting Up the Environment
First, set-up the required environment variables for building the binaries.
The commands and output messages in this article are color-coded for clarity, as listed in the table below.
| Color | Notation |
| Blue | Commands running in Development PC |
| Red | Commands running in Jetson Board |
| Green | Output messages in the Jetson Board |
| Purple | Adding patch file source Manually |
Table 1: Color Notation
Note: Please download your product developer guide manual from e-con’s Developer Resources and follow the build commands given in the Setting Up Environment section in the developer guide manual for setting up the environment..
Step 2. Downloading the Requirements
After setting up the environment, you’ll need to download the requirements using the links provided in the following table on your Linux-based system for upgrading to JetPack 6.2.
| Prerequisites | Download link |
| Bootlin Tool chain | Bootlin Toolchain Sources, 2020.08-1 |
| L4T Jetson AGX Orin™, Orin Nano™, Orin NX driver Package | Driver Package (BSP) |
| L4T Jetson AGX Orin™, Orin Nano™, Orin NX sample Rootfs | Sample Root Filesystem |
| Driver Package source | Driver Package (BSP) Sources |
| e-con product’s JetPack 6.0 release package | Download from the e-con’s Developer Resources Website using your Login Credentials. |
Table 2: Prerequisites
Note: You should ignore all the download links provided in the developer guide manual.
To download the e-con product’s release package, please refer to the Release Notes or FTP Deliverables to access the package login credentials, as shown below for reference.
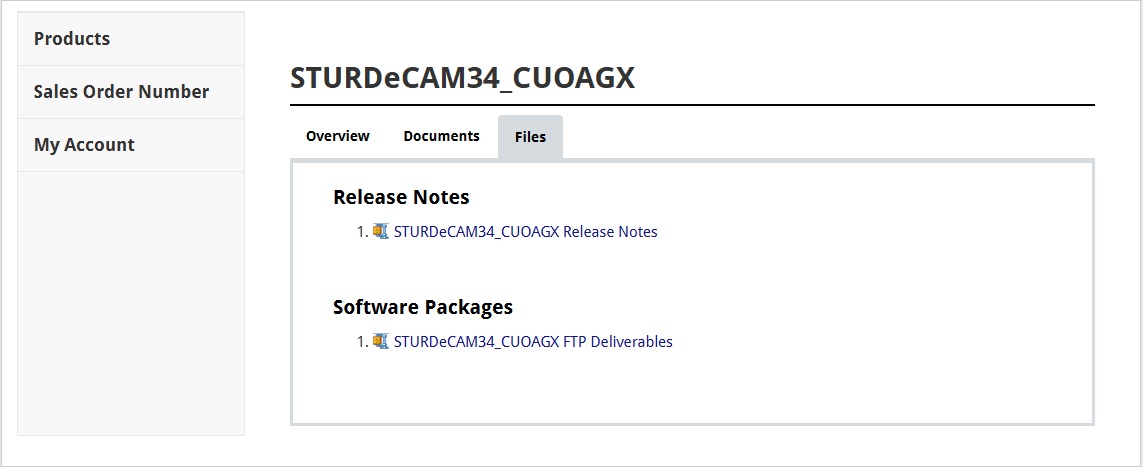
Figure 4: Camera Product Package Login Credentials Details
In the Release Notes document, you can view the login credentials for accessing the package. Then, after entering the login credentials, you can view the camera product packages as a reference image shown below.
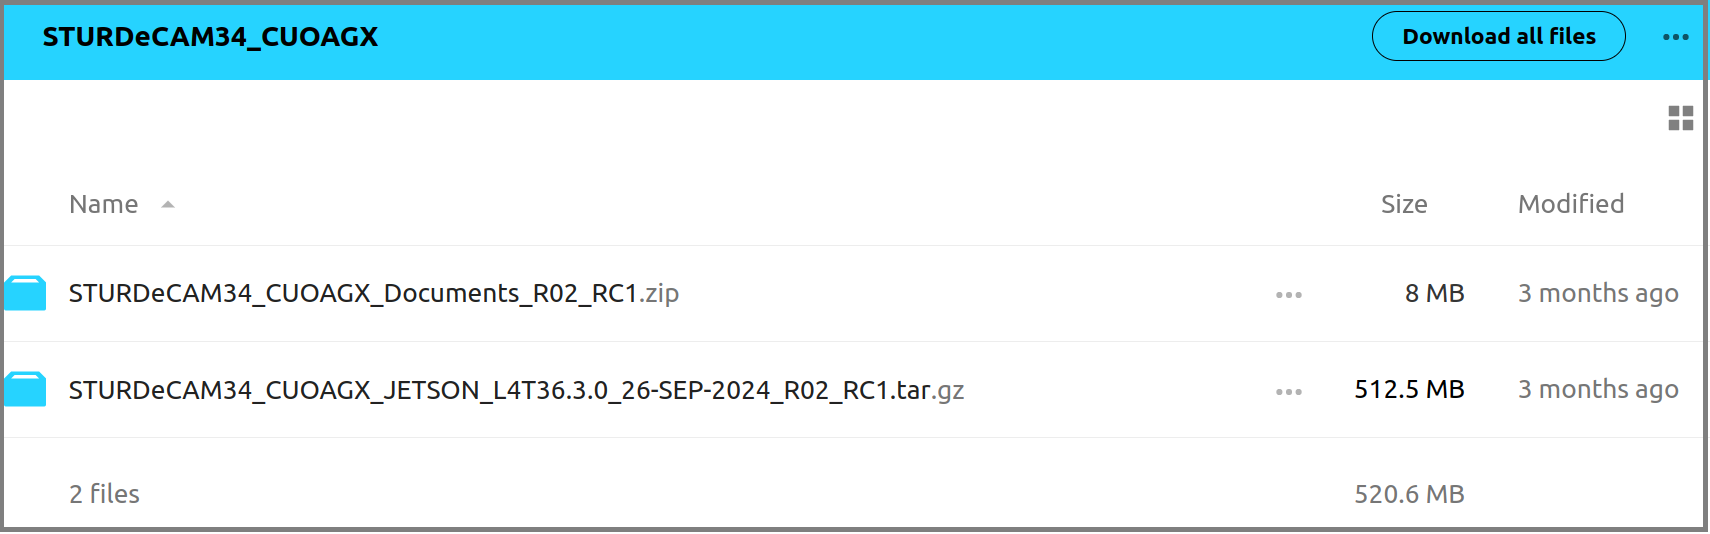
Figure 5: Camera Product Document and Package Details
Step 3. Extracting and Preparing L4T
After downloading the NVIDIA® source files and e-con Systems® product’s release package, you’ll need to extract and organize them on the Linux-based system to build the binaries by following the developer guide manual. Please note that the building commands are documented for JetPack 6.0. When executing these commands, you must replace the downloaded file name of JetPack 6.2 with JetPack 6.0 and 6.1. You can refer to the correct name of JetPack 6.2 from the table below.
| NVIDIA Package | JetPack 6.0 | JetPack 6.1 | JetPack 6.2 |
| BootlinTool chain | aarch64–glibc–stable-2022.08-1.tar.bz2 | aarch64–glibc–stable-2022.08-1.tar.bz2 | aarch64–glibc–stable-2022.08-1.tar.bz2 |
| L4T Jetson AGX Orin™, Orin Nano™, Orin NX driver Package | Jetson_Linux_R36.3.0_aarch64.tbz2 | Jetson_Linux_R36.4.0_aarch64.tbz2 | Jetson_Linux_R36.4.3_aarch64.tbz2 |
| L4T Jetson AGX Orin™, Orin Nano™, Orin NX sample Rootfs | Tegra_Linux_Sample-Root- Filesystem_R36.3.0_aarch64.tbz2 | Tegra_Linux_Sample-Root- Filesystem_R36.4.0_aarch64.tbz2 | Tegra_Linux_Sample-Root- Filesystem_R36.4.3_aarch64.tbz2 |
| Driver Package source | public_sources.tbz2 | public_sources.tbz2 | public_sources.tbz2 |
Table 3: JetPack 6.0, 6.1 and 6.2 File Names
Step 4. Extracting the Release Package
After extracting the NVIDIA package, you should extract the e-con’s release package.
You can view the e-con’s extracted release package as a reference image shown below.
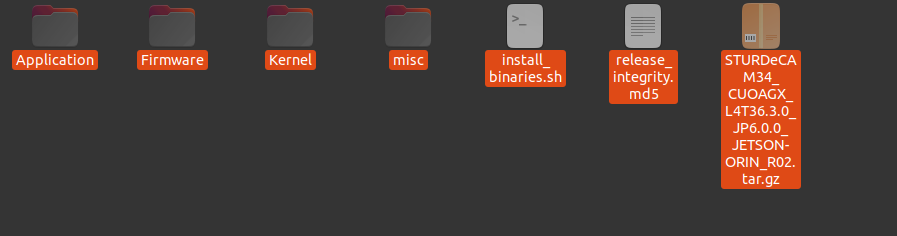
Figure 6: e-con’s Release Package Files
After gathering NVIDIA and e-con Systems® package files in one place, you’ll need to configure the kernel to support your specific camera hardware.
Step 5. Downloading and Configuring the Kernel
Once downloaded, you’ll need to configure the kernel by applying patches from the e-con JetPack 6.0 release package to the NVIDIA JetPack 6.2.
Note:
- Please download your product developer guide manual from e-con’s Developer Resources and follow steps 1 to 4 for the build commands in the Downloading and Configuring the Kernel section.
- For the driver package source, please download it as listed in Table 2 above.
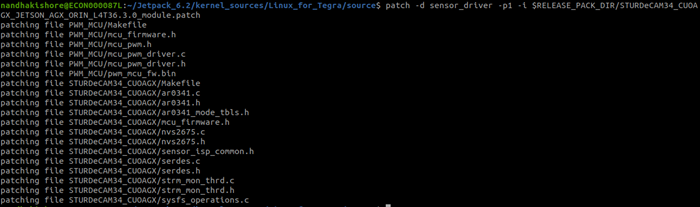
After steps 1 to 4 in the Downloading and Configuring Kernel section, you’ll need to run the following commands to apply e-con patch files.
a. Run the following command to apply the module patch.
mkdir -p sensor_driver

patch -d sensor_driver -p1 -i $RELEASE_PACK_DIR/Kernel/<module patch file name>
The screen will appear similar to the screen shown below.
b. Run the following command to remove the vcc-supply.
sed -i 's/vcc-supply/\/\/vcc-supply/g' $RELEASE_PACK_DIR/Kernel/<device tree overlay blob patch file name>
c. Run the following command to apply the device tree blob overlay patch file.
patch -p1 -i $RELEASE_PACK_DIR/Kernel/<device tree overlay blob patch file name>
After applying the device tree blob overlay patch file, the output screen will appear similar to the screen shown below.

If you encounter a message like the one shown above, when applying a device tree blob overlay patch, enter no. If you don’t see this message, you can skip this step and proceed with the next step.
The output message will appear on the Linux-based system, if you enter no as shown below.
patching file hardware/nvidia/t23x/nv-public/nv-soc/tegra234-soc-camera.dtsi

Reversed (or previously applied) patch detected!  Assume -R? [n] n

Apply anyway? [n] n

Skipping patch.

5 out of 5 hunks ignored -- saving rejects to file hardware/nvidia/t23x/nv-public/nv-soc/tegra234-soc-camera.dtsi.rej

patching file hardware/nvidia/t23x/nv-public/overlay/Makefile

Hunk #1 succeeded at 65 (offset 5 lines).

patching file hardware/nvidia/t23x/nv-public/overlay/<camera_modes>.dtsi

patching file hardware/nvidia/t23x/nv-public/overlay/<camera_overlay_filename>.dts
d. Run the below command to remove g_parm and s_parm functions from the nvidia-oot patch.
For MIPI camera products (e-CAM50_CUONX, e-CAM80_CUONX, e-CAM81_CUONX, e-CAM200_CUONX, e-CAM80_CUOAGX, e-CAM200_CUOAGX),
sed '/@@ -2224,6 +2227,26 @@ static long tegra_channel_default_ioctl/,/tegra_channel_close/d' $RELEASE_PACK_DIR/Kernel/ > tempfile && mv tempfile $RELEASE_PACK_DIR/Kernel/
For e-CAM_YUV_GMSL camera products (NileCAM20_CUOAGX, NileCAM21_CUOAGX, NileCAM25_CUOAGX, NileCAM81_CUOAGX, STURDeCAM20_CUOAGX, STURDeCAM21_CUOAGX).
sed '/@@ -2224,6 +2223,26 @@ static long tegra_channel_default_ioctl/,/tegra_channel_close/d' $RELEASE_PACK_DIR/Kernel/ > tempfile && mv tempfile $RELEASE_PACK_DIR/Kernel/
For e-CAM_OCTA_YUV_GMSL PRODUCT based products (STURDeCAM25_CUOAGX, STURDeCAM31_CUOAGX & STURDeCAM81_CUOAGX) and STURDeCAM34_CUOAGX).
sed '/@@ -2224,6 +2231,26 @@ static long tegra_channel_default_ioctl/,/tegra_channel_close/d' $RELEASE_PACK_DIR/Kernel/ > tempfile && mv tempfile $RELEASE_PACK_DIR/Kernel/
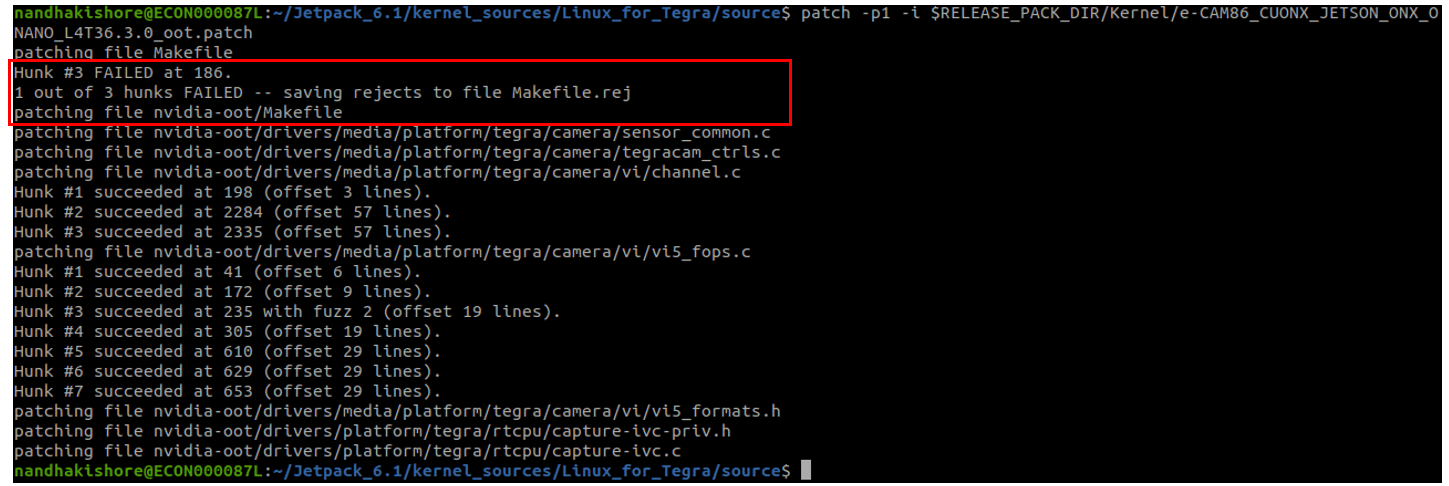
After removing the g_parm and s_parm functions, you need to apply the Nvidia-oot patch.
e. Run the following command to apply the nvidia-oot patch file.
patch -p1 -i $RELEASE_PACK_DIR/Kernel/<nvidia-oot patch file name>
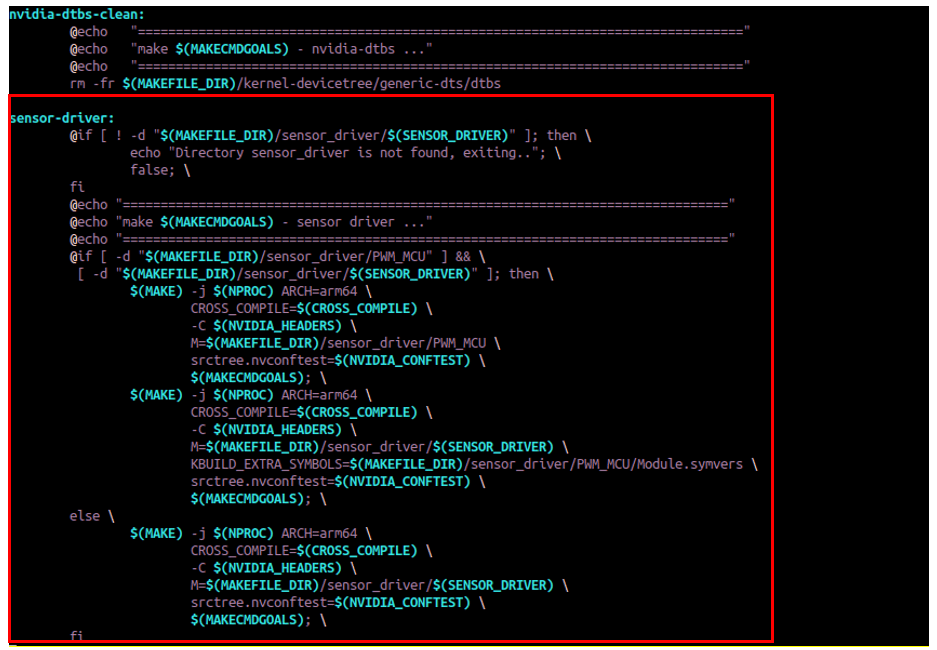
While applying the Nvidia-oot patch, if the Makefile is not updated automatically, the output screen will appear as shown below.
If the Makefile is not updated automatically, you should manually add the nvidia-oot Makefile by including the sensor-driver block provided below into the kernel source Makefile.
sensor-driver:
@if [ ! -d "$(MAKEFILE_DIR)/sensor_driver/$(SENSOR_DRIVER)" ]; then \
echo "Directory sensor_driver is not found, exiting.."; \
false; \
fi
@echo "================================================================================"
@echo "make $(MAKECMDGOALS) - sensor driver ..."
@echo "================================================================================"
@if [ -d "$(MAKEFILE_DIR)/sensor_driver/PWM_MCU" ] && \
[ -d "$(MAKEFILE_DIR)/sensor_driver/$(SENSOR_DRIVER)" ]; then \
$(MAKE) -j $(NPROC) ARCH=arm64 \
CROSS_COMPILE=$(CROSS_COMPILE) \
-C $(NVIDIA_HEADERS) \
M=$(MAKEFILE_DIR)/sensor_driver/PWM_MCU \
srctree.nvconftest=$(NVIDIA_CONFTEST) \
$(MAKECMDGOALS); \
$(MAKE) -j $(NPROC) ARCH=arm64 \
CROSS_COMPILE=$(CROSS_COMPILE) \
-C $(NVIDIA_HEADERS) \
M=$(MAKEFILE_DIR)/sensor_driver/$(SENSOR_DRIVER) \
KBUILD_EXTRA_SYMBOLS=$(MAKEFILE_DIR)/sensor_driver/PWM_MCU/Module.symvers \
srctree.nvconftest=$(NVIDIA_CONFTEST) \
$(MAKECMDGOALS); \
else \
$(MAKE) -j $(NPROC) ARCH=arm64 \
CROSS_COMPILE=$(CROSS_COMPILE) \
-C $(NVIDIA_HEADERS) \
M=$(MAKEFILE_DIR)/sensor_driver/$(SENSOR_DRIVER) \
srctree.nvconftest=$(NVIDIA_CONFTEST) \
$(MAKECMDGOALS); \
fi
If you encounter problems building the binaries using nvidia-oot Makefile, the image below shows the proper Makefile structure.
 into Kernel Source Makefile
f. Run the below command for proper camera streaming.
For MIPI products (e-CAM50_CUONX, e-CAM80_CUONX, e-CAM81_CUONX, e-CAM200_CUONX, e-CAM80_CUOAGX, e-CAM200_CUOAGX),
sed '238,238d' $NVIDIA_SRC/nvidia-oot/drivers/media/platform/tegra/camera/vi/vi5_fops.c > tempfile && mv tempfile $NVIDIA_SRC/nvidia-oot/drivers/media/platform/tegra/camera/vi/vi5_fops.c

sed '228i#endif' $NVIDIA_SRC/nvidia-oot/drivers/media/platform/tegra/camera/vi/vi5_fops.c > tempfile && mv tempfile $NVIDIA_SRC/nvidia-oot/drivers/media/platform/tegra/camera/vi/vi5_fops.c
For e-CAM_YUV_GMSL products (NileCAM20_CUOAGX, NileCAM21_CUOAGX, NileCAM25_CUOAGX, NileCAM81_CUOAGX, STURDeCAM20_CUOAGX, STURDeCAM21_CUOAGX),
sed '236,236d' $NVIDIA_SRC/nvidia-oot/drivers/media/platform/tegra/camera/vi/vi5_fops.c > tempfile && mv tempfile $NVIDIA_SRC/nvidia-oot/drivers/media/platform/tegra/camera/vi/vi5_fops.c

sed '226i#endif' $NVIDIA_SRC/nvidia-oot/drivers/media/platform/tegra/camera/vi/vi5_fops.c > tempfile && mv tempfile $NVIDIA_SRC/nvidia-oot/drivers/media/platform/tegra/camera/vi/vi5_fops.c
For e-CAM_OCTA_YUV_GMSL products (STURDeCAM25_CUOAGX, STURDeCAM31_CUOAGX & STURDeCAM81_CUOAGX) and STURDeCAM34_CUOAGX,
sed '240,240d' $NVIDIA_SRC/nvidia-oot/drivers/media/platform/tegra/camera/vi/vi5_fops.c > tempfile && mv tempfile $NVIDIA_SRC/nvidia-oot/drivers/media/platform/tegra/camera/vi/vi5_fops.c

sed '230i#endif' $NVIDIA_SRC/nvidia-oot/drivers/media/platform/tegra/camera/vi/vi5_fops.c > tempfile && mv tempfile $NVIDIA_SRC/nvidia-oot/drivers/media/platform/tegra/camera/vi/vi5_fops.c
After successful kernel configuration, the next step is to build and install the built binaries.
Step 6. Building the Kernel
This section involves building the kernel image, dtbo, and modules for the Jetson SoM on the Linux-based system.
Run the following commands to build the binaries.
make -C kernel

make modules

sudo -E make modules_install

make dtbs
After building the binaries successfully, you’ll need to flash the SoM.
Step 7. Flashing Jetson SoM
Now, you need to flash the Jetson™ SoM using the build binaries in two ways. You’ll see the two ways of flashing the jetson SoM in detail in the section below.
7.1 Using Developer Guide Procedure
To flash the Jetson SoM, run the commands provided in the “Flashing Jetson Development kit” section of the developer guide manual.
Note: Please download your product developer guide manual from e-con’s Developer Resources to flash the Jetson SoM.
7.2 Using SDK Manager
Another method of flashing the Jetson SoM is using NVIDIA SDK Manager. You’ll need to follow the below steps for the flashing method using NVIDIA SDK Manager.
- Go to NVIDIA’s official website and download the NVIDIA® SDK Manager.
- Install the SDK Manager and log in with your NVIDIA Developer account.
- Choose your Jetson SoM and JetPack 6.2 version, then follow the step-by-step instructions to install JetPack 6.2.
Now that you have flashed the Jetson SoM, it is time to transfer the required binaries to the Jetson SoM.
7.2.1 Deploying Binaries to Jetson SoM
In this step, you’ll copy the binaries, place all essential components, including the customized modules, DTBO files, firmware, and miscellaneous files, properly to enable camera integration on the NVIDIA Jetson SoM. To complete this process, you’ll need to follow the steps below.
- Run the following command to navigate to the L4T directory path in your Linux-based System.
cd $NVIDIA_SRC/kernel-devicetree/generic-dts/dtbs/
- Connect the Jetson SoM and host PC using a Type-C USB cable.
- Run the following command to copy the Device Tree Blob Overlay to the Jetson™ SoM.
scp tegra234-p3767-camera-p3768-eimx568-4lane.dtbo nvidia@192.168.55.1:Note: The DTBO File name must be used as the name mentioned in the Developer Guide Manual.
- Run the following commands to compress and copy all the Kernel modules to the Jetson SoM.
cd $LDK_ROOTFS_DIR/lib/

sudo tar -cjmpf kernel_supplements.tar.bz2 modules/
- Run the following command to copy all the Kernel modules to the Jetson SoM.
scp kernel_supplements.tar.bz2 nvidia@192.168.55.1:
- Run the following commands to copy the firmware file to Jetson SoM.
cd $TOP_DIRNote: You can skip the above command If e-con’s Release Package does not contain the firmware directory.
scp -r $RELEASE_PACK_DIR/<Firmware directory name> nvidia@192.168.55.1:If your camera uses an NVIDIA ISP, you must run the following commands to copy the tuning files from the e-con’s release package to your Jetson SoM to achieve the best image quality.
cd $TOP_DIR

scp $RELEASE_PACK_DIR/misc/<camera overrides file name> nvidia@192.168.55.1:
- Run the following commands to update the Nvidia-provided v4l2-compliance binary.
cd $TOP_DIR

scp $RELEASE_PACK_DIR/misc/v4l2-compliance nvidia@192.168.55.1:
7.2.2 Deploying Binaries to root directory on Jetson SoM from the Home Folder
- Run the following command to copy the firmware to their specific path in the Jetson™ SoM.
sudo cp <firmware directory name>/* /lib/firmwareNote: You can skip the above command if e-con’s Release Package does not contain the firmware directory.
- Run the following command to copy the Device Tree Blob Overlay to their specific path in the Jetson SoM.
sudo cp tegra234-p3767-camera-p3768-eimx568-4lane.dtbo /boot/
Note: The DTBO File name must be used as the name mentioned in the Developer Guide Manual.
- Run the following command to copy the kernel supplements to their specific path in the Jetson SoM.
sudo tar -xjmpf kernel_supplements.tar.bz2 -C /usr/lib/
- Run the following command to copy the ISP Tuning File to their specific path in the Jetson SoM.
sudo cp <camera overrides file name> /var/nvidia/nvcam/settings/camera_overrides.ispNote: If e-con’s Release Package does not have camera_overrides.isp file, skip the above step.
Now that you have flashed the Jetson SoM, it is time to load the necessary overlay and drivers.
Step 8. Loading Overlay and Drivers
Lastly, with the Jetson SoM flashed, run the following command to load the overlay file for your modules.
sudo /opt/nvidia/jetson-io/config-by-hardware.py -n2="<Overlay_name>"
Note: Use the overlay name provided in the developer guide manual
An output message will appear, as shown below.
Modified /boot/extlinux/extlinux.conf to add following

DTBO entries:

/boot/<dtbo_name>

Reboot system to reconfigure.
After applying the overlay, a system reboot is necessary to activate the new configuration. During boot processes, the Jetson SoM loads the updated DTBO settings, ensuring that the selected hardware configuration is applied seamlessly and the Jetson™ SoM will reboot automatically.
Note:For e-CAM_OCTA_YUV_GMSL products (STURDeCAM25_CUOAGX, STURDeCAM31_CUOAGX and STURDeCAM81_CUOAGX), specify the module loading order using following commands.
sudo bash -c 'echo "tegra_camera" >> /etc/modules'

sudo bash -c 'echo "capture_ivc" >> /etc/modules'

sudo bash -c 'echo "max96712" >> /etc/modules'

sudo bash -c 'echo "mcu_pwm" >> /etc/modules'

sudo bash -c 'echo "ecam_gmsl_yuv_common" >> /etc/modules'
For STURDeCAM34_CUOAGX product, specify the module loading order using following commands.
sudo bash -c 'echo "tegra_camera" >> /etc/modules'

sudo bash -c 'echo "capture_ivc" >> /etc/modules'

sudo bash -c 'echo "max96712" >> /etc/modules'

sudo bash -c 'echo "mcu_pwm" >> /etc/modules'

sudo bash -c 'echo "ar0341_camera" >> /etc/modules'
Step 9. Camera Verification
Once you have set everything, you need to check if the system recognizes the device. After the camera is detected, you need to check the camera streaming using V4L2 or GStreamer.
Now that you have seen the procedure for upgrading the camera from JetPack 6.0 to JetPack 6.2, let’s see how you can upgrade from JetPack 6.1 to JetPack 6.2.
Upgrading From JetPack 6.1 to JetPack 6.2
To upgrade the camera products JetPack 6.1 to JetPack 6.2, follow steps 1 to 4 from the first section, Upgrading From JetPack 6.0 to JetPack 6.2, and then follow the below steps from the second section, Upgrading From JetPack 6.1 to JetPack 6.2.
Note:
- Please download your product developer guide manual from e-con’s Developer Resources and follow steps 1 to 4 for the build commands in the Downloading and Configuring the Kernel section.
- For driver package source, please download as listed in the above Table 2.
Follow the steps below to apply the patch files.
a. Run the following command to apply the module patch.
mkdir -p sensor_driver

patch -d sensor_driver -p1 -i $RELEASE_PACK_DIR/Kernel/<module patch file name>
The screen will appear similar to the screen shown below.

b. Run the following command to remove the vcc-supply.
sed -i 's/vcc-supply/\/\/vcc-supply/g' $RELEASE_PACK_DIR/Kernel/<device tree overlay blob patch file name>
c. Run the following command to apply the device tree blob overlay patch file.
patch -p1 -i $RELEASE_PACK_DIR/Kernel/<device tree overlay blob patch file name>
After applying the device tree blob overlay patch file, the screen will appear similar to the screen shown below.

d. Run the below command to remove g_parm and s_parm function from the nvidia-oot patch.
For e-CAM25_CUONX ,
sed '/@@ -2281,6 +2285,28 @@ static long tegra_channel_default_ioctl/,/tegra_channel_close/d' $RELEASE_PACK_DIR/Kernel/<nvidia-oot patch file name> > tempfile && mv tempfile $RELEASE_PACK_DIR/Kernel/<nvidia-oot patch file name>
For e-CAM86_CUONX,
sed '/@@ -2281,6 +2288,26 @@ static long tegra_channel_default_ioctl/,/tegra_channel_close/d' $RELEASE_PACK_DIR/Kernel/<nvidia-oot patch file name> > tempfile && mv tempfile $RELEASE_PACK_DIR/Kernel/<nvidia-oot patch file name>
After removing the g_parm and s_parm functions, run the following command to apply the nvidia-oot patch file.
patch -p1 -i $RELEASE_PACK_DIR/Kernel/<nvidia-oot patch file name>
You need to apply the nvidia-oot patch without any issues. You will not receive any warnings or hunk failures.
Then, follow the same procedure from Step 6: Building and Installing the Kernel to Step: 9 Camera Verification in the first section, Upgrading From JetPack 6.0 to JetPack 6.2 to verify the camera.
e-con Systems Driving Innovation in Embedded Vision
Since 2003, e-con Systems® designs, develops, and manufactures cutting-edge OEM cameras. As an NVIDIA Elite partner, we offer seamless integration with the Jetson platform, including Jetson AGX Orin™, NVIDIA® Jetson Orin NX/Nano™, Jetson Xavier™ NX/Nano/TX2 NX, and Jetson AGX Xavier™ to help customers navigate the transitions for AI-powered embedded applications.
Below is the list of cameras you can upgrade to NVIDIA JetPack 6.2 from NVIDIA JetPack 6.0.
- STURDeCAM20_CUOAGX – IP67 Full HD GMSL2 HDR camera for Jetson AGX Orin™ / AGX Xavier™
- STURDeCAM21_CUOAGX – IP67 Full HD GMSL2 HDR Camera for Jetson AGX Orin™ / AGX Xavier™
- STURDeCAM25_CUOAGX – FHD AR0234 IP67 Global Shutter GMSL2 Multi Camera for NVIDIA Jetson AGX ORIN™ / AGX Xavier™
- STURDeCAM31_CUOAGX – 3MP 120dB HDR NVIDIA® Jetson Orin™ Camera for Autonomous Mobility
- STURDeCAM34_CUOAGX – 3MP 140dB HDR GMSL2 Camera for NVIDIA® Jetson AGX Orin™
- STURDeCAM81_CUOAGX – IP67 4K GMSL2 Camera for NVIDIA® Jetson AGX Orin™/ AGX Xavier™
- NileCAM20_CUOAGX – Full HD GMSL2 HDR camera for Jetson AGX Orin™ / AGX Xavier™
- NileCAM21_CUOAGX – HDR GMSL2 Multi-Camera Solution for NVIDIA® Jetson AGX Orin™ / AGX Xavier™
- NileCAM25_CUOAGX – Full HD GMSL2 Global Shutter camera for NVIDIA® Jetson™ AGX Orin™ / AGX Xavier™
- NileCAM81_CUOAGX – AR0821 4K HDR GMSL2 Camera for NVIDIA® Jetson AGX Orin™/ AGX Xavier™
- e-CAM200_CUOAGX – 20MP(5K) AR2020 High Resolution Multi-camera Solution for NVIDIA® Jetson AGX Orin™
- e-CAM80_CUOAGX – 4K camera based on SONY IMX415 for NVIDIA® Jetson AGX Orin™/ AGX Xavier™
- e-CAM50_CUONX – 5MP AR0521 Color Camera for NVIDIA® Jetson Orin NX / Orin Nano
- e-CAM80_CUONX – 4K Sony Starvis IMX415 Ultra Low Light Camera for NVIDIA® Jetson Orin NX / Orin Nano
- e-CAM81_CUONX – 4K HDR Camera for NVIDIA® Jetson Orin NX / Orin Nano
- e-CAM200_CUONX – 20MP (5K) AR2020 High Resolution Camera for NVIDIA® Jetson Orin NX / Orin Nano
Below is the list of cameras you can upgrade to NVIDIA JetPack 6.2 from NVIDIA JetPack 6.0.
- e-CAM25_CUONX – FHD AR0234 Global Shutter Camera for NVIDIA® Jetson Orin NX / Orin Nano
- e-CAM86_CUONX – 8MP Sony® Starvis 2 IMX678 Camera for NVIDIA® Jetson Orin NX / Orin Nano
Our camera solutions offer multi-camera support of up to 8 cameras, high resolutions up to 20 MP, excellent low-light imaging, fine-tuned ISP, LFM, global shutter, and more.
See all our cameras based on NVIDIA Jetson platform
Explore Camera Selector to view our full camera products.
For specialized expert support, please contact us at camerasolutions@e-consystems.com. Our experts will assist you in selecting and seamlessly integrating the perfect camera for your application.

Prabu is the Chief Technology Officer and Head of Camera Products at e-con Systems, and comes with a rich experience of more than 15 years in the embedded vision space. He brings to the table a deep knowledge in USB cameras, embedded vision cameras, vision algorithms and FPGAs. He has built 50+ camera solutions spanning various domains such as medical, industrial, agriculture, retail, biometrics, and more. He also comes with expertise in device driver development and BSP development. Currently, Prabu’s focus is to build smart camera solutions that power new age AI based applications.