| |
Introduction
|
| |
| The See3CAM_10CUG_C is a 1.3 MP USB 3.0 Global Shutter Camera with CS Mount Holder based on the onsemi® AR0134, CMOS image sensor. This See3CAM_10CUG_C is a UVC-compliant USB3.0 SuperSpeed Camera that is also backward compatible with USB2.0 host ports and does not require any special camera drivers. The See3CAM_10CUG_C is capable of supporting 720p60 (HD) , 1280x960 resolution at 45 fps and 640x480 binned VGA at 45 fps when interfaced to a USB3.0 host port.The See3CAM_10CUG_C is supported with S/C/CS-mount lens holder for enabling the users to choose the lens as per their requirements.
|
| |
| Robot Operating System (ROS) is a collection of software frameworks which are collectively targeted for robot development. It provides an easy package management toolset which allows to install and use specific packages that are required in a robots design. For example a robot which uses camera for running computer vision algorithms can include packages specific to opencv, whereas a stationary robot whose primary purpose is to aid in lifting heavy weights can include packages specific to servo control. |
| |
This document explains about the following:
- How to use the image data from a See3CAM10_CUG_C USB camera in a system running ROS
- How to build a sample ROS based application.
|
|
| |
Scope
|
| |
| This document is intended as a getting started guide for application developers who wish to use the images from See3CAM_10CUG_C camera on a system running ROS. |
| |
Prerequisites
|
| |
| The current ROS distribution (Jade) must be installed on a PC running ubuntu 14.04. The installation instructions can be found here. The system should also have provision for connecting a USB3.0 device. Make sure that the See3CAM_10CUG_C camera is working fine with the sample app "see3camguvcview" which is also provided by e-con. |
| |
Note:
Installing the ros-jade-ros-base package should do fine. But installing ros-jade-desktop-full package will remove the need to install dependencies at a later stage. |
| |
A brief on ROS
|
| |
The fundamental concepts of the ROS implementation are
- nodes
- messages
- topics
- services
- master
|
| |
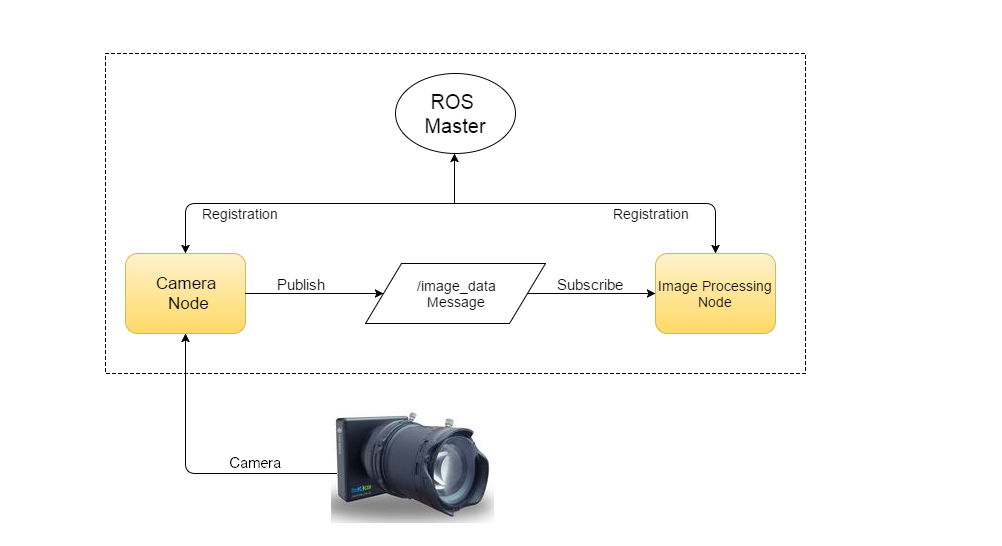
| ROS is designed to use a modular architecture using independent nodes. A ROS node is a process which performs some form of computation. They are used to communicate with the underlying hardware and transmit the data in a ROS understandable format. ROS nodes communicate with each other by using messages. A message is a strictly typed data structure. The format of message used between a pair of nodes is predefined. |
| |
| The output of a node is "published" in a specific type of message. A node "subscribes" to a topic when it wishes to receive data from it. In this case, the node which outputs data is called as a publisher whereas the node which receives data is called as a subscriber. When a publisher and subscriber use the same topic, data is transferred. Hence, topics can be effectively called as the virtual data bus in a ROS system.
|
| |
| There can be multiple publishers and subscribers to a topic. The ROS master keeps track of all the publishers and subscribers and provides registration service to all the nodes in a ROS system.
|
|
 |
| Figure 1 - An example showing the ROS framework |
| |
| This modular architecture provides ease of development and debugging. For example a bug free node which publishes camera data can be run constantly. Whereas a node which uses opencv can be started and stopped whenever necessary without modifying the camera data publisher. This is usually the case when developing a new application with different opencv implementations. This increases productivity when the robotic system becomes more complex and interconnected. |
| |
Installing uvc_camera driver for ROS
|
| |
| Before installing the camera driver for ROS, create a workspace directory where all the ROS related work is going to be done. |
| |
- $ mkdir ~/ROS_WS/src -p
- $ cd ~/ROS_WS/src
|
| |
| Install a modified version of uvc_camera driver for ROS which has support for HID extension unit. It can be installed using the following commands: |
| |
- $ git clone https://github.com/dgossow/see3cam
- $ cd see3cam
- $ git checkout 3a071f453ae240503ca6dcea53b27ae5f2e3628d
- $ sudo apt-get install ros-jade-camera-info-manager
- $ sudo apt-get install libudev-dev
- $ cd ~/ROS_WS/
- $ catkin_make
|
| |
| The installed package has to be added to the .bashrc file. This can be done by adding the following lines to the end of .bashrc file. |
| |
- #Setup environment for uvc_camera driver for ROS
- source ~/ROS_WS/devel/setup.bash
|
| |
Sample application for camera streaming
|
| |
|
The next step is to create a ROS package or application which we are going to be using for streaming the camera. Add the following lines to the .bashrc file as well as update the current bash shell with it so that we don't get any build errors.
- #Update ROS_WS to ROS environment
- export ROS_PACKAGE_PATH=$ROS_PACKAGE_PATH:~/ROS_WS
- $ source ~/.bashrc
The following command will create a sample package with the mentioned dependencies:
- $ roscreate-pkg SampleROSapp image_transport roscpp std_msgs uvc_camera
- $ roscd SampleROSapp
- $ mkdir launch && cd launch
Create a file named camera.launch and add the following contents to that file.
<!--XML-->
<launch>
<node ns="camera" pkg="uvc_camera" type="uvc_camera_node" name="uvc_camera" output="screen">
<param name="width" type="int" value="640" />
<param name="height" type="int" value="480" />
<param name="fps" type="int" value="30" />
<param name="frame" type="string" value="webcam" />
<param name="device" type="string" value="/dev/video0" />
</node>
</launch>
This package can now be built and run using the following commands:
Run the following command to launch the camera streaming.
- $ roslaunch SampleROSapp camera.launch
The camera begins streaming after the execution of the above command but no preview is shown. This is because the above command only executes a publisher for camera streaming. A new topic will be created named as "/camera/image_raw" where the camera image data is being published to. Check this by using the following command in a new terminal.
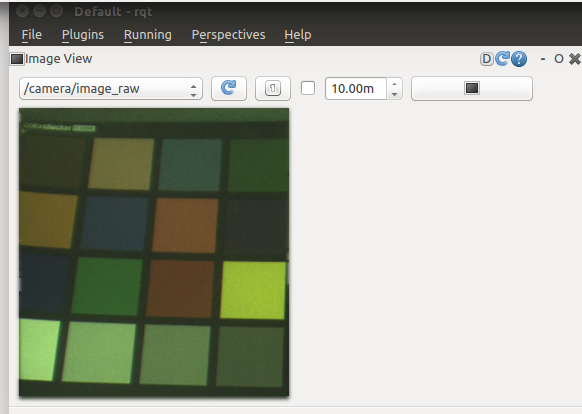
To preview the image data that is being published on the /camera/image_raw topic, we have to add a listener or subscriber to it. This can be done by simply using the rqt or the rqt_image_view.
- $ sudo apt-get install ros-jade-rqt-image-view
- $ rqt_image_view
|
| |
 |
| Figure 2 - Preview of camera in rqt |
| |
|
Once the application has opened, select the /camera/image_raw from the drop down list box. This will show the preview of the camera frames. If it is not listed, click the refresh button once.
It is possible to see the subscriber and publisher information using the following command.
|
| |
- $ rostopic info /camera/image_raw
|
| |
- Type: sensor_msgs/Image
- Publishers:
- * /camera/uvc_camera (http://:/)
- Subscribers:
- * /rqt_gui_cpp_node_9794 (http://:/)
|
| |
|
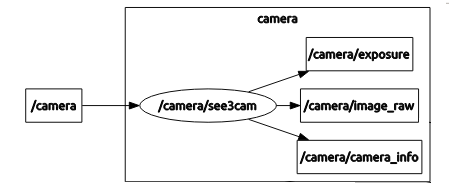
The topic list can also be viewed in tree form using the node-graph plugin for rqt.
- $ sudo apt-get install ros-jade-rqt-graph
- $ rqt_graph
|
| |
 |
| Figure 3 - The node graph listing all the topics |
| |
|
Note:
Remove the file "~/.config/ros.org/rqt_gui.ini" if the command rqt_graph fails and try again.
|
| |
Known Issues and Limitation
|
| |
- This document is intended only as a getting started guide.
- HID commands have not been tested although they are supported (only for See3CAM_10CUG). More updates have to be done regarding this.
- The above steps have been tested on a PC running Ubuntu 14.04 64-bit only. The procedure might vary slightly for other distributions.
- In case of any missing package dependencies, they can be easily installed using the apt-get tool of ubuntu. Most of the packages for ROS jade will begin with the prefix "ros-jade-" followed by the actual package name.
|
| |
References
|
| |
* https://en.wikipedia.org/wiki/Robot_Operating_System
* http://wiki.ros.org/jade/Installation/Ubuntu
* http://wiki.ros.org/cv_bridge/Tutorials/UsingCvBridgeToConvertBetweenROSImagesAndOpenCVImages
|
| |
Conclusion
|
| |
| This article would assist customers in using our See3CAM_10CUG_C with ROS. |
| |
 |
| |